For What Its Worth
Distributer Installation in a V8
SBC
If you don't have such a tool, don't worry it's not critical to do it this way. If you don't pump it up this way, I would crank the engine with the ignition disengaged until you get oil pressure before you attempt to start it.
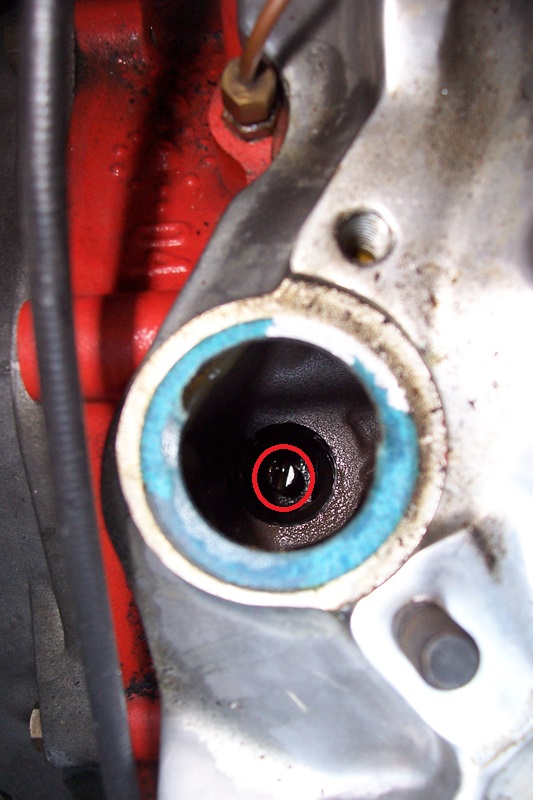
When putting in the distributor it goes down twice, once to engage the gears, and once to engage the pump. The pump only aligns every 180 degrees since it is a simple notch. See picture of the notch.
Now the distributor.
Old fashioned points. Install the points and condenser. Gap the points. Install the rotor. Don't forget the point lube on the cam that actuates the points. Not too much.
HEI style, make sure the rotor and everything below is installed correctly.
If re-installing a previous used one, make sure the shaft run-out and up-down free play are in spec. A wobbly distributor will drive you crazy trying to figure out why it misses or wont fire.
Next make sure #1 cylinder is at Top Dead Center or where you want the initial timimg to be. TDC means at the top of the compression stroke. The crank turns twice for every time the distributor turns once. Many people put their finger on #1 and feel when the compression builds to tell when it is the compression stroke. Not a little puff, that could be the exhaust, but when it tries to blow your finger into your ear that should be the compression. Turn engine with a wrench etc. by hand to align the crank to about 8 degrees before top dead center. Then look in your manual and see where #1 wire is supposed to be on the distributor. Put the cap on, Mark the #1 position on the distributor base under the cap. Make it easy to see, a marker, tape etc. Take cap off.
Put the round gasket on the distributer. Make sure the area on the intake where the gasket seats is clean and smooth.
Point the rotor to where # 1 wire goes then back it of about 25 degrees(Turning Rotor CCLW). It will turn Forward/CLW when the gears engage the Cam.
Put the distributer in with the vacuum advance pointing between the carb and valve cover on the passenger side.
As you push down it may hang on the cam Gear, turn the rotor back and forth a little until you feel it engage the cam gear.
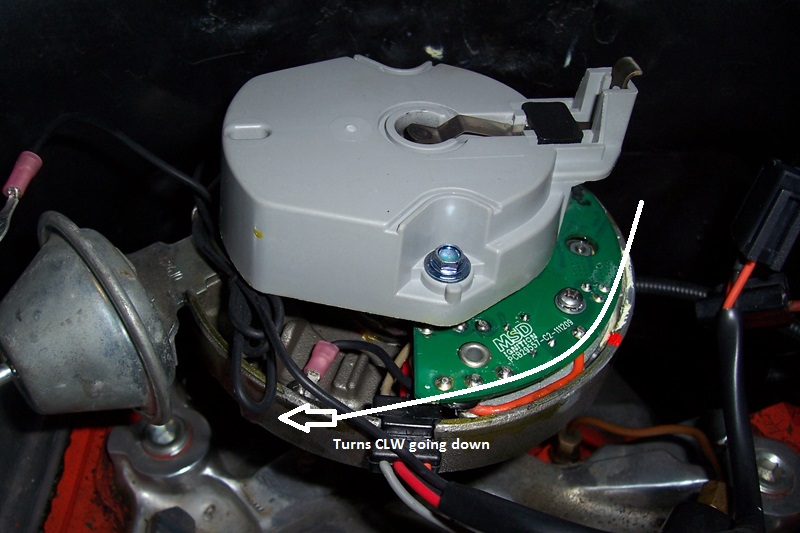
This picture shows a distributor going in, just as it begins to engage the cam gear.
It may not go all the way down after engaging the cam gear. It may not be aligned with the oil pump rod. If this is the case you will have to turn the crank until it drops in all the way, after engaging the oil pump rod correctly. (A helper may be needed to turn the crank or run the starter) The distributor should be all the way down at this point.
Now put #1 back on Top Dead Center of the compression stroke and then at the initial timing mark if you moved the crank. Remember crank turns twice to distributor turning once.
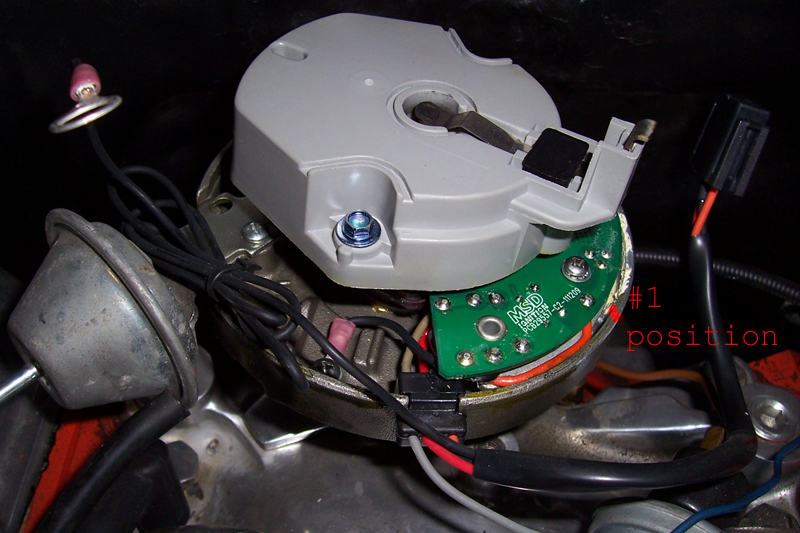
Check that the rotor is pointing to the #1 wire location.
This picture shows the distributor down and the crank set to the initial timing mark. The rotor points to the #1 plug mark. There are 14 gears on the distributor gear. If you are off you will be off by 25 degrees or more.
Check that the vacuum advance is in the correct position. Assure you have enough room to turn the distributor for timing adjustment without the vacuum advance hitting the valve cover or other things.
Install the clamp and bolt, and snug down, lightly tighten.
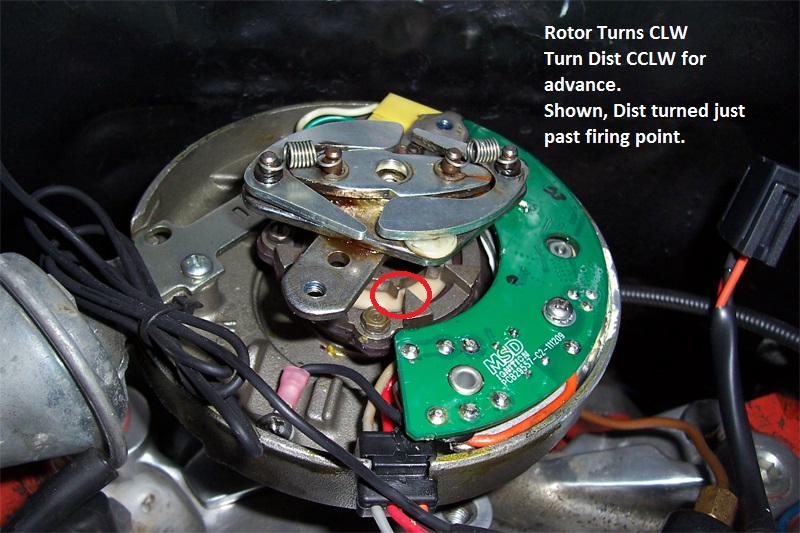
Now move the distributer a little until the points are closed. CLW or CCLW depends on how close you are to begin with. On HEI move until the pick up is aligned point to point. Then move the distributer CCLW until the points begin to open on a point system. On an HEI CCLW Until the pickup is about 1/32" from alignment, a very small amount of movement.
This picture shows the pick up tabs on an HEI distributor.
Snug down the clamp bolt to assure distributor doesn't move when started, but not too tight. You need to do final adjustment after the car is running. The rotor should be pointing at #1 wire position.
When it comes time to fire the engine, it should start without needing to move the distributer. Using this install method I am consistently within 5 degrees of the desired timing mark.
Now put on cap wires, plugs etc.
8 7
6 5
4 3
2 1
front of car
The firing order is, (MEMORIZE IT) 18436572. Looking in a book and checking if you have your plug wires on right just doesn't work well. You need to be able to do it from memory.
Distributor rotor turns in a CLW direction when looking from the top. On the cap #8 wire is CLW of #1, #4 is CLW of #8 and so on.
Doing a distributor install the first time may take two or three tries to get the rotor and vacuum advance all pointing where they should go. A little experience and it is easy.
Now use the Timing light to do final adjustments and tighten the distributor down.
Start the car, without the vacuum advance hooked up and set the initial timing with a timing light. Plug the vacuum line to prevent idle problems. This should be below 800 RPM, to make sure the mechanical advance is not functioning. You should be able to turn the distributor by hand, but it should be snug enough to stay where you turn it to when setting it with a timing light.
When done setting the timing, tighten the distributor clamp down to prevent it from moving. Careful to not move the distributor when tightening it down. Hook up the vacuum advance line.
Often times you will see TV or other mechanics turning the distributer drastically this way and that to get the car to start. This is a sign of DIF, distributor installation failure. It always gives me a good laugh to see them do this.
Be careful of some after market aluminum distributors. They may be good for racing, but not for the street. The aluminum alloy used and lack of anodizing may cause a lot of aluminum corrosion INSIDE the Cap. Too much corrosion and things go haywire. Anodizing is chemical conditioning against corrosio.
Here are some other opinions on the subject from Steve's Nova Site.
Rewiring
Tune up notes