For What Its Worth
Rear Springs
I put in a set of ESPO 3 leaf springs on my 66. This was a dire emergency after replacing the front coil springs.The 66 drives much better with 3 leafs. It tends to pick up the front and transfer the weight to the back better than mono's under heavy throttle.
When ordering springs call and tell whoever you order springs from you want:
- All the spring
bushings. Front/Rear Also the bushings
in the frame for the shackle. At first I used stock
'rubber' ones, they lasted for 40 years, but that was with lower HP.
- 2 sets of Shackles, shackle bolts and nuts. (On the 66 that was 4 shackle plates, 4 square headed shouldered bolts and 4 self locking nuts) If the old ones look bad at all the price is cheap. At least it was for me.
- The multi leaf springs
of course.
- If you want to use U
bolts, 4 U bolts with
nuts.
- 2 front spring
bolts with self locking nuts.
- 1 set of spring
pads, for the top. Make sure they are the ones that fit
your car.
Getting the rear bushings out of the frame. Sometimes the bushings may not want to come out. They are 2 piece put in from either side. On my 66, they sort of fell out. On my 67 they acted as if they were glued in. Factory, almost rocks. Hard and inflexible. I had to use a wood chisel to chunk out about 1/3 of the bushing then split the bushing down the length with the wood chisel. Warning; put oil on the chisel to help pull it back out, it can get stuck in there. After chunking enough off and splitting the bushing, it eventually gave up and came out. All 4 of them had this problem. Even when I had the one side out, I couldn't nock the other side out with a large long socket and hammer. Chunk and split.
Tighten the front and rear bushings most of the way until they start snugging up in the holes, but do not tighten all the way. They need to be able to slip a little until the weight of the car is on them, especially the rears. Once the weight of the car is on them and the springs are at running height/location, then tighten them completely.
If your car has the T bolts, a pop with a 5 lb./2.5Kgm hammer knocks them out once the spring is out of the way.
Mounting multi leaf springs in the Mono spring mount.
Some places offer a mono to multi-leaf adapter for these cars which will simplify the install by providing the correct hardware, spring pads, spacers etc. Make sure that the adapter fits your spring pack. There are 3 leaf, 5 leaf and possibly other kits available. If the kit doesn't match the thickness of your spring pack, it wont be much help. You can also assemble your own kit, but it may take a few trips to hardware stores to find everything.
I didn't triple check when I bought my kit and it was for 5 leafs. The listing didn't mention how many leafs it was for. I ended up making a few trips to the hardware store before I was done to get it all to work.
Thicker springs will require longer bolts or U bolts for mounting the springs to the rear end.
When using U bolts be careful and don't kink the brake lines when you have to move them out of the way to put the U bolts around the rear end. Also the U bolts may be 1 size bigger than the T bolts, the holes in the plate and rear end mounts may need to be opened one size.
New spring pads need to be the right ones. The first set of pads I got were too wide and the built in steel centering washer was going to interfere. Maybe they were bottom spring pads, but they wouldn't work as uppers. My Chevy II does not use a centering bolt on top of the springs. The mounting kit I bought had the stock
style pads that fit the upper mount. I did not use pads on the bottom with 3 leafs. My kit also did not use a spring pad on the bottom. My assembly manual states the lower pads were not used on wagons & F40 springs. I believe these were stock style multileaf.The spring bolt in my springs is countersunk/flush on top. My springs came with countersunk headed spring bolts and a chamfer in the top side spring. Flat on the upper side of the spring when all assembled. The nut on the bottom side of the spring. The 66 spring locates with the nut for the spring bolt going through a hole in the lower mount. The mounting kit I had came with standard bolts for the extra length spring bolts. Would the head clear the upper mount, maybe I didn't check. I didn't like the way the bolt head would have fit in the counter sink in the spring. I decided to use the style of bolt that came with my springs.


Bolting up the lower mount and springs. In the end I ended using standard grade 8 bolts.
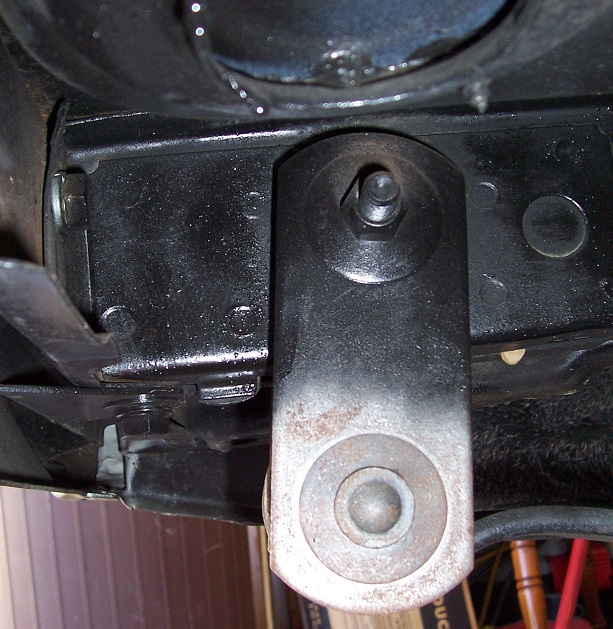
Note these mounting bolts are one size bigger than stock since I had opened the holes for U bolts originally. To get a wrench on the head of these bolts on the upper mount one of two things need to be done. Use Allen wrench bolts with washers. You can't get a wrench on these bolt heads when in the channel of the mount. Maybe that is why stock used "T" bolts. The other option is use a spacer to move the bolt heads up to allow getting a wrench on them. Even with spacers from the kit to make the heads accessible, I had to file a little clearance on the wrench to get it to work.
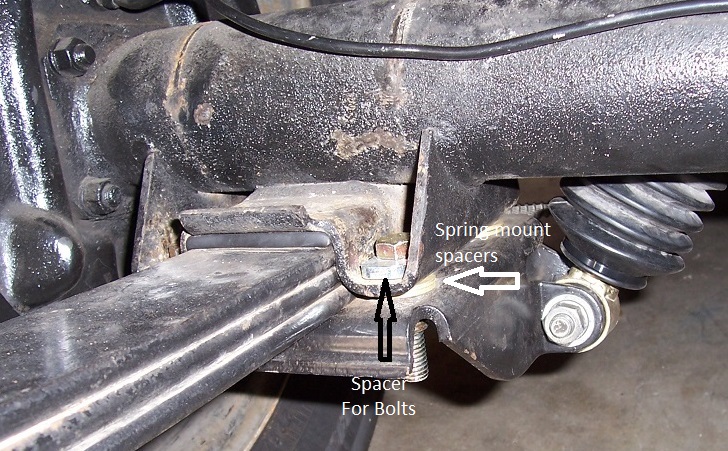
Mono leafs didn't have spacers between the upper and lower mount. With multi-leafs spacers between the upper and lower mount assure the lower mount is even side to side and front to back. So you don't bend the lower mount.
For spacers between the upper and lower mount I used SME washers for spacers.
The multi-leaf kit I
bought was for 5 leaf springs and the spacer was too thick for the spring
mounts.
Having multiple washers
per bolt that want to slide off and getting the lower mount plate up, and
all 4 bolts thru, bushing in the lower mount hole and 2 nuts started is 90%
of the work.
If the spacers between the upper and lower mounts are too wide, the spring will not be held tightly and this will cause major problems sooner or later. Make sure the spring is held correctly.
Problems I had with Lock Nuts.U bolts worked great, Until I took the nuts off for an adjustment. Then the locking nuts destroyed the threads. When I was a mechanic many moons ago this didn't happen. I blame this on the quality of the lock nuts. In fact it happened with lock nuts from the multi leaf kit also. On OK, off, bugger. True Value locking nuts of a better grade worked much better for me.