For What Its Worth
Installation of shoulder seat belts in a 66 Chevy II 4 door
The 66 came with simple lap seat belts only. No shoulder belts and no retractors. Being a big guy, I want all the holding power I can get if someone decides to run into me. A safety improvement is always a worthy upgrade.First I decided to use the seat belts from WESCO performance. The 3 point setup with a retractor. Also I choose the 11 inch sleeved receiver belt for bucket seats. This is a very long seat belt. I am big as I stated before and I had no trouble getting this seat belt around me after installation.
All bolts and nuts are grade 5 or 8, SAE washers and lock washers. Yes they cost more, but this is NOT the place to cut corners and try to save a few dollars.
What you will need for front seat belts
2 sets of the 3 point seat belts. Choose the sleeved or floppy end as needed.
2 right angle connectors to connect the seat belt retractor and end to the old location. Get good strong ones, not thin ones. Wesco offers them also.
2 7/16 x 1 inch bolts. Along with nuts lock washers and washers.
4 7/16 x 1 inch fine thread bolts with lock washers. These go into the old stock seat belt mounts when installing the new hardware.
If you choose the sleeved ends for bucket seats;
- 2 more right angle connectors. To align the sleeved seat belt correctly. The sleeves are worth it with bucket seats, no hunting for the end to connect the seat belt to.
- 2 more 7/16 x 1 inch bolts. Along with nuts lock washers and washers.
4 1/8 inch steel pop rivets for installing the new shoulder mount points. Even though these wont be carrying stress, you don't want this coming loose, don't use aluminum.
2 7/16 shoulder bolts for the shoulder mount point. Also 2 washers.
2 1 1/2" hole plugs. I found mine at LOWES in their hardware drawers. Other places stopped at 1 3/8" plugs.
Drills needed, a 1/8, .500 and 1.5 inch metal hole saw.
Wesco also offers hardware packages. It may be easier and cheaper to order it all from them. If you have an older car with no seat belt mounting points.. I strongly suggest the Wesco packages with the large fender washers. The fender washers are installed under the car when adding seat belts. They distribute the load if needed in a crash. Otherwise the bolts will pull through the sheet metal.
Washers are needed on the seat belt ends when not using a shoulder bolt, but a 7/16" bolt only. Seat belt ends are usually 1/2" to allow the use of a shoulder bolt.
On 4 doors, wagons and post cars, install the upper mount in the post. I put mine about as high as it would go. I sit very tall. Everyone in my family that will drive in the car is 6 foot or more so that is good for us. Newer cars have some adjustment on the upper mount to better fit the height of the user. See what is comfortable for you in a newer car and see if you can recreate that height in your hobby car.
When installing the mount it is inserted through the 1 1/2" hole you drilled. One problem, if you drop it when putting it in place where does it go? Yup, right to the bottom of the post. Then you need to fish with magnets, roll the car, etc. My suggestion is get about 12"/ 400 mm of bailing wire. Make a 1"/25mm loop in one end, big enough it wont pull through the center hole in the mount. , thread it through the center of the mount and then feed the bailing wire into the 1 1/2" hole and out the 1/2" hole. The bailing wire can then be used to help position and hold the mount until the pop rivets are in. The bailing wire will keep you from dropping the mount. Once riveted in the bailing wire can be removed.
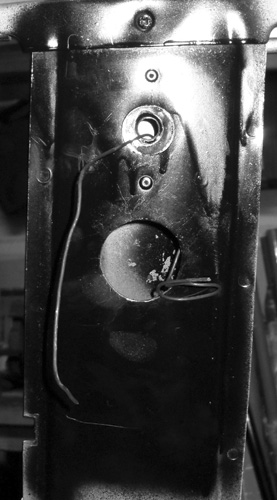
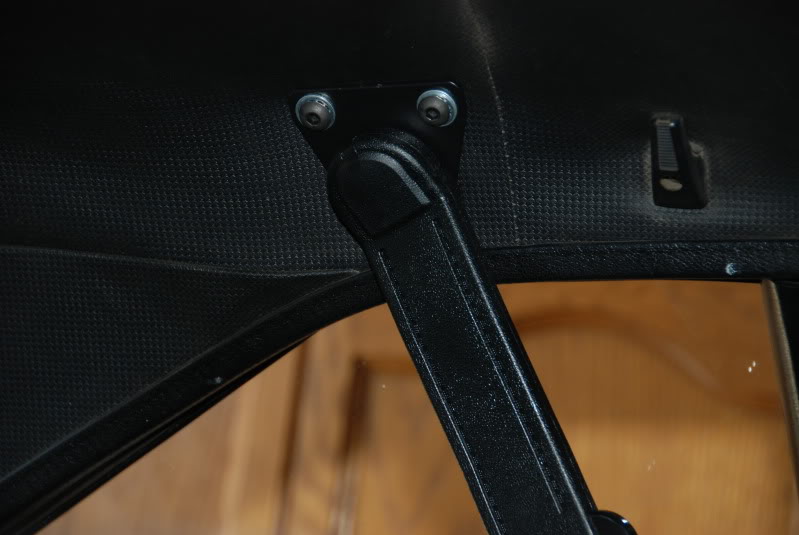
Picture of upper mount installed and removing the bailing wire. Note the pushed out side of the threaded hole is outboard, away from the flat sheet metal.
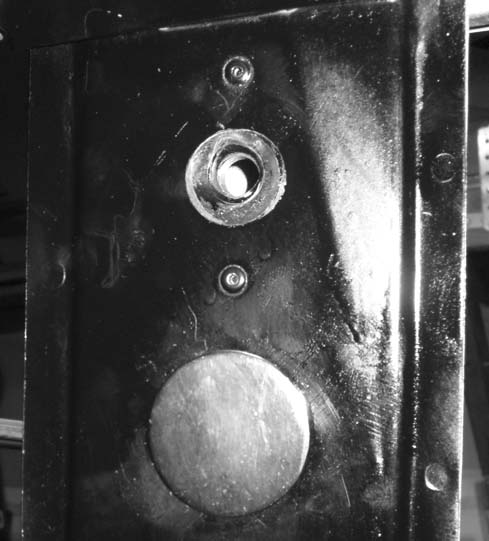
Picture once plug is put in the access hole.
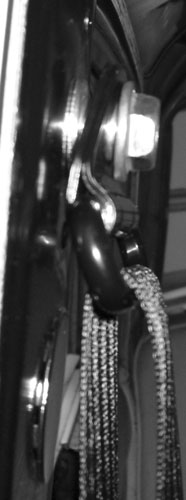
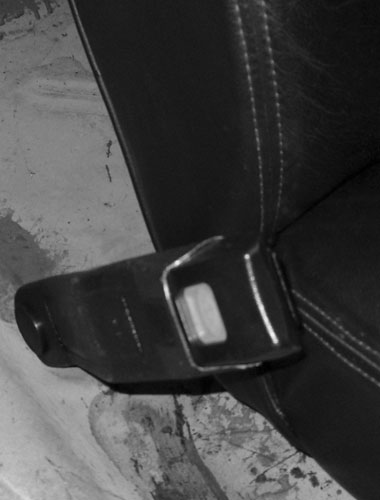
Picture of seat belt installed in upper mount.
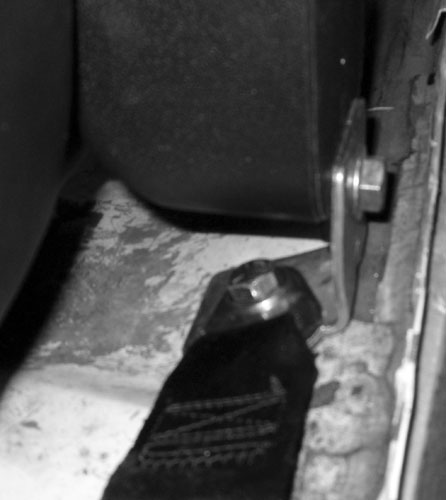
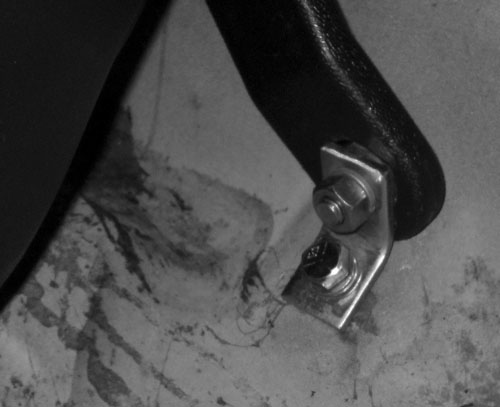
I used a washer under the step bolt to assure that it sandwiched the post sheet metal flat and even between the plate and shoulder bolt. Without the washer the bolt can be bent or loaded on one side if it does not fit into the sheet metal hole perfectly. In my case the 1/2" hole wandered about 1/8 off center for some reason when drilling. (Old dull drill?) The result was without a washer the bolt would have had sheet metal under one side and just the plate under the other. Side loaded or twisted. I have had bolts break under stress when they are unevenly loaded or side loaded. You don't want this to happen in a crash. The other option would have been grind the sheet metal away so the shoulder nested against the plate all the way around.
The seat belt mounts were not flat on my 66, but at an angle on both inside and outside mounts. OK for the original stock floppy belts with no retractors. Not good for the new seat belts.
On my car I had to bend the right angle connectors to about 110 degrees, open them up a bit. 5 lb. hammer and an anvil works well for this. This is to assure the retractor would be vertical when installed. If not vertical it wont release correctly. Also on the inboard belt, this was needed to position the seat belts correctly against the bucket seats. See pictures.
Picture of outside, retractor mount and opposite end mounted to right angle bracket. Notice how the one end of the seat belt is also bolted to the floor when the right angle bracket holding the retractor is bolted to the floor. This is one of the Wesco right angle brackets.
Pictures of inside, rigid belt, bolted to the car and how it sits against the bucket seats.
I made this bracket. Milder steel than the Wesco one, but thicker to make up for it
Overall result
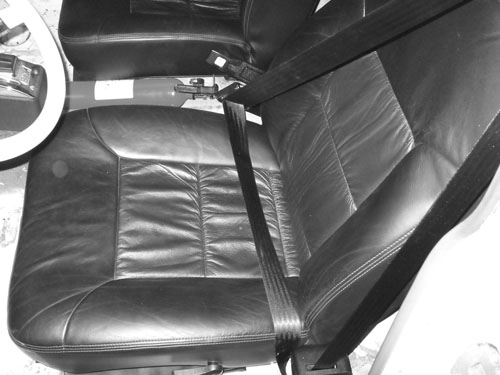
Seat belt, feels good and easy to find the end when buckling the seat belt. A little more safety in these old cars. They need all they can get.
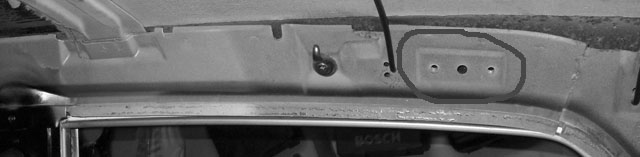
The 66 had a 3 point seat belt option, but it mounted far behind the driver. The body has 2 threaded holes for bolting the mount to the car. The mount would have a threaded hole in the center for the Lanyard connection. The lanyard is needed to extend the mounting point forward to the front seat. Unless you are going back to original condition, the above method may be an easier way to go.
Stock 3 point mounting location, passenger side Normally hidden under the headliner. The mount location is circled, way back above the back door on my 4 door. Front of the car is to the left in this picture, front door is not in the picture.
A picture of a Morris Classic Concepts 3 point belt that mounts in the stock location behind the driver in a 1970 Nova 2 door. An extension is used to position the seat belt. Driver side, above the back window.
Back to the 66' Nova page